Showing posts with label diy. Show all posts

Tuesday, January 21, 2014

MY SAD ATTEMPT AT WOOD BURNING

Since moving down to Fort Rucker, I've learned two days is my limit on entertaining myself. I can go to the gym, go for runs, try rock climbing, clean, watch TV, etc- but then I'm bored. Unfortunately when everyone you know is working there are limits on what you can do when you live in the middle of no-where.

When this happens I become a needy pain in the ass to Dear Hubby. I'm sure many an Army Wife has experienced this. If this continued I would have children or, more likely, buy myself a menagerie to just give myself something to do.

To curb the needy-ness, Hubs has encouraged every crazed craft idea I've come home with, and occasionally brings me handy time consuming gifts. Once he brought home a top of the line sewing machine I have promised myself I won't ever become domesticated enough to try.

What did intrigue was a wood burning kit. A couple on our honeymoon to Curaçao gave us a beautiful wooden heart ornament. I was just going to write "CURÇAO 2013" on it with marker, but this seemed more elegant.

I believe he got this at his Mecca, Lowes.
It came with several different "tips" for different effects. They get HOT and they will burn you so this isn't something to do with small kids running around. It's probably best to handcuff them to the television or let a stranger borrow them while you do this. 


I looked up a few things on google images and this looked AWESOME! Look at all the crazy dope masterful things I can make! I can take Hubby's pieces of scrap wood and become a milliontrilliongazillionaire! I WILL RULE ETSY. 


I tried a few of them out, making different shapes, dots, and curves. I found out I sucked pretty hard. 


My next attempt was to freehand CURAÇAO for the ornament. I did a pretty crap job. Maybe I can get a blind person to give me a few pennies for this stuff, but I think they will know better. 


After practicing a little bit more I drew a hummingbird, and went over it with the only tip I had figured out how to use: the calligraphy tip

. I had planned to put a bird on the ornament, and after this attempt I didn't feel so crappy. I bet I could even convince  a choice 4 year old to buy this off of me for a few quarters (Not my cousin Christie though, she's a fashionista and would whittle me down to a nickel)


After taking a break due to some hand cramps, I went back to it, this time taking some time to draw out the word in pencil first. I tried to freehand a little dazzle on the end and it turns out to be a bit of a tragedy but I'm starting to have faith this might not turn out so bad. 

Getting a hang of the curvy lines, and figuring out when to turn my body or the wood took a lot of time. I also learned that the crappier and less smooth the wood, the more difficult it is to navigate the pen. 

I can always lie and say a small island child burned it for us. 

I think maybe next I'm going to get some cheap wooden spoons, then slowly and methodically destroy them in the name of art. 


Tuesday, January 7, 2014

Make Your Own Jewelry Box

Since moving to Fort Rucker, Hubby has gotten into anything that gets and keeps him in the garage. He might have done it to originally get away from the cat, and continued to do it to get away from me. BUT HAHA I HAVE TRICKED HIM! Instead I started making him help me with projects. 

For xmas I decided to it would be more fun and personal to make my hippie sister a jewelry box since she doesn't have one. 

I went to Michael's where they have already make wood boxes and other things like below. 

After I made hubs take off all the hardware, we decided to test the stains we plan on using for a dresser we've been working on forever that refuses to get done- cherry red and an ebony. 


First we taped the wood on top that we would later stain ebony and put down the cherry stain

Then we mixed a tint and a poly together in an empty sour cream cup
Applied the mixture on top of the stain with a sponge brush.
After it dried we removed and ret taped, then did the ebony.
Here's before and after tinting. 

I helped a little but most of the time I was "management" which was just as fun. 

You could also paint it as well. Painting would probably be faster because the process of sanding, staining, poly-ing the whole thing took over a week, where as you could do this all in one day with paint. 

We picked up some red sparkle felt with I thought a hippie would like but was sort of classy and would match with the cherry red and ebony. 

When all was said and done I wrote a little note on the inside with gold paint. 


Also from Michael's/Mecca, I picked up these flowers which, after practicing an arrangement, I used 3,000lb epoxy to glue them down. They ain't goin' no wheres. 

We realized later that we tinted the red too much and you couldn't tell much of a difference between that and the ebony... but now we know. 

When I called on Christmas she was so excited and really loved it- and it made me feel pretty great to make something with my hands, to to boss my husband around and have him enjoy it. 


Wednesday, November 27, 2013

CHEAP POSTER "PICTURE FRAMES"

I've been struggling a lot with whether to decorate the house since I'm only here for a few short months. In the end I decided to just do it. Even though it feels like a time waster, it's nice to make it feel a little more like home.

When I lived in Seattle I had gathered all these music posters from various film shoots I'd been on, and when I got to Chicago I wanted each one to have a totally different black or white frame. Too bad there's no such frame size that exists for this stuff, and custom made would have been expensive.

In fact, frames in general were expensive. So I said EFF it and found another way.


Instead I went to Blick- an arts and crafts store down town Chicago, and picked up a bunch of clips. I clipped them to the poster, and the hung it on a small nail on the wall.

My wall in Chicago was really long so they were spread out and looked really nice.

One of my more recent additions- the Wolf Poster, was one of two posters from my last show in
Chicago- Murder by Death, Larry and his Flask, and The Blind Staggers. The second poster was
#15/100 in existence. I'm not a poster collector but I thought that was pretty sweet. 

And the best part was packing them, and putting them back up was the easiest thing ever. I just stacked them neatly and put them all in a picture box. Then, all I had to do was put a nail in the wall and hang it again- and you don't have to even try to make it straight because they just fall that way.


I put them all up in my "Reading Nook" - the room with the corner bar, big screen TV and a huge comfy chair.

Unfortunately I had some poor planning. Since being in Chicago I've gotten a lot more pieces- like the washboard I bought at an art show.


Bought at 4Miles 2Memphis Art Show, owned by Danielle of American Pickers,
my best friend and drummer of the band S.S. Web played in during their set.
And I still have 2 more albums to add. Everything looks really cluttered right now. The simple solve is to spread it out over two walls, but again, considering we're leaving in 3 months I think I'll leave it and just remember for the next house.

There's tons of other ways to do this, and I am looking at a few ways to do it with my wedding photos. I found this website and I have some plans for our new house in El Paso.

http://freshome.com/2012/08/22/12-affordable-tricks-to-originally-bring-photography-into-your-home/


Tuesday, November 26, 2013

MAKE YOUR OWN (PENIS CAKE) STAND

I made a stand for the topper of my bachelorette cake. You can make a stand for anything, this happens to be for a penis. My mom said to get rid of it's because it's gross but she has no sense of humor. 


My friends threw me an awesome, Pin Up themed bachelorette party, with this amazing penis cake. 


They also made all the girls pin up hair pieces (mine was extra big and feathery), as well as gave everyone black eyeliner and red lipstick. It was amazing. 


Afterwards, I couldn't let all this awesome go to waste and I wanted to save it and put it in our bar room (called my Reading Nook). The problem, however, is how do you make a penis on a stick stand up and not look weird. BUT I MEAN LOOK AT HOW COOL IT IS. 


So I soldiered on and made a stand for it. Really you can make a stand for anything. Flowers, wine bottles, etc. Whatever you can glue to a stick and put in styrofoam. That said, get a styrofoam something. Mine is square. Then take spraypaint and coat the whole thing. I like shiney stuff so I used metalic silver.


Next, since I'm trying to match my Pin Up Penis, I went to michaels and got studded ribbon. There's no real fabric to it, it's just straight up bling which is nice since it's not real see through. Then I took hot glue and glued it down in rows and on top until the whole thing was covered. 


Once covered I took my hair piece and pinned it down using pearl topped pins, so it would look pretty still. I also used a pin to keep the veil swirled in place. 


And then, of course, the penis goes last!


Tuesday, November 12, 2013

Cocktails Made Mild- Tasty Drinks for Pregnant Ladies

One of my lady friends recently got pregnant, which sucks for both of us because she is a super fun party girl. She's still super fun, but it still sucks to not be able to go out and drink a cocktail with everybody.

So Dear Husband and I decided to remedy that.

We came up with non-alcoholic drinks that mimic regular cocktails, and made a basket with all the ingredients. I also learned how to make different flavored simple syrups to give the different tastes, and they are pretty fun to play around with.


I poorly designed a recipe book, printed it out and stapled it. If I had more time, I would have printed it out on card stock, three hole punched the side and made binders out of ribbons. Sadly I suck, but there's a good idea for you.

Here's some of the recipes. Also I love crappy fonts. I don't care. This was is called Angelic War. Whatevers. Haters gonna hate.


Brooch Bouquets: The biggest, most worth it pain in the butt

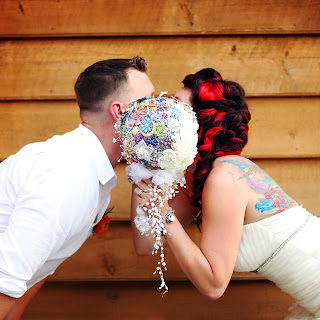
Since I posted my gorge wedding photo thanks to Endless Expressions Photography By Beth I've gotten a lot of compliments and people who were interested in making it.


The brooch bouquet, in theory, was a fantastic idea. We were having a sort of last-minute wedding with only 11 people while we waiting for the right time to have a big bash. I was really sad I wouldn't get to have all my friends and family there, so I asked everybody to send me a brooch so I would remember them on my big day. And it looked easy (which it was) but also crazy time consuming.

Things you need:
Glue gun
A crap ton of brooches (I picked up a kit off etsy)
Styrofoam Ball
Spray Paint (Metallic of any color)
Wooden Dowel (Bouquet holder)
Ribbon
Tule
Extra pins

Things I also got:
I went to Michael's and went wild in the Bridal section with all things pearls.
A "3d" ribbon of vitage flowers
Ivory fabric for the flowers
Pearl topped pins
Glitzy buttons

1) You need a theme or it'll look like a mess. Pick a color scheme, or the beach, etc. I chose vintage flowers and pearls to match my dress, jewelry, and hair.

2) I spent several hours in front of the TV making "vintage flowers" of different size.
This is how I did it - after I glued it I attached them with pearl-topped pins to a piece of Styrofoam
Here's another way if you're boring and don't like fire. 


3) During the days that was going, I took a big ball of Styrofoam I got at Michael's, and used metallic silver spray paint. I went over it 3 times.


4) I took my wooden dowel I got at michael's, stuck it into the ball as hard as I could, then determined the proper length for holding it. Because I have a husband with a lot of tools, I asked him to saw off the excess. Then I put a ton of glue in the hole, and stuck in the wood (that's what she said).

5) After the wood dried for about 10 min, I pinned down the flowers along one side.


6) Whoever sent me the brooches on etsy took off the backs because she said it would make it easier, all I had to do was got a set of pins and glue it to the back of the brooch and then stick it into the ball. This proved time wasting and frustrating, so I just picked out a brooch, fitted it in the area, and glued the whole thing down. Sometimes I had to unglue it and move it around, but that was rare and it didn't muck anything up too much.

7) As I glued, I worked in the brooches from my family and friends. Most of the time I tried to put them over the "brooch base" of the brooches I got from etsy, but sometimes they were pretty big so I gave them a space of their own.


8) I wrapped light blue ribbon around the stick twice, gluing it as I went. Once that dried, I wrapped the  feeling, "3d" flower ribbon around it.


9) In the wedding section at Michael's I got long strings of pearls and attached them to the base, so that when I held the bouquet it looked like a pearly waterfall.


10) The tule I bought ended up coming in many round sheets, so I bunched them up and used the pearl pins to put them in place by the base and over the start of the "pearly waterfall." Then I glued the sparkly buttons going down the stick on top of the ribbon.


11) Lastly, I took pearl pins, and pinned down pearl embellishments all over. Then, I filled in any holes the brooches left with the pearl pins.


It took a lot of hours, and one awesome Man of Honor to help get it done. But Phew, we got there and despite it all I was so happy with the result, and I can't wait to use it in our big wedding!


Pretty Photos of the bouquet and the photo of myself and patient hubs done by Endless Expressions by Beth Photography. Call her up if you're ever in Pensacola!