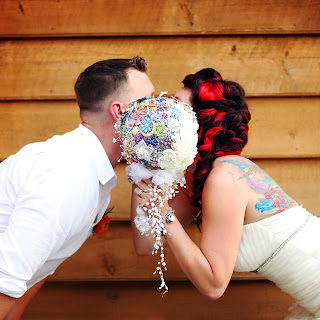
The brooch bouquet, in theory, was a fantastic idea. We were having a sort of last-minute wedding with only 11 people while we waiting for the right time to have a big bash. I was really sad I wouldn't get to have all my friends and family there, so I asked everybody to send me a brooch so I would remember them on my big day. And it looked easy (which it was) but also crazy time consuming.
Things you need:
Glue gun
A crap ton of brooches (I picked up a kit off etsy)
Styrofoam Ball
Spray Paint (Metallic of any color)
Wooden Dowel (Bouquet holder)
Ribbon
Tule
Extra pins
Things I also got:
I went to Michael's and went wild in the Bridal section with all things pearls.
A "3d" ribbon of vitage flowers
Ivory fabric for the flowers
Pearl topped pins
Glitzy buttons
1) You need a theme or it'll look like a mess. Pick a color scheme, or the beach, etc. I chose vintage flowers and pearls to match my dress, jewelry, and hair.
2) I spent several hours in front of the TV making "vintage flowers" of different size.
This is how I did it - after I glued it I attached them with pearl-topped pins to a piece of Styrofoam
Here's another way if you're boring and don't like fire.
4) I took my wooden dowel I got at michael's, stuck it into the ball as hard as I could, then determined the proper length for holding it. Because I have a husband with a lot of tools, I asked him to saw off the excess. Then I put a ton of glue in the hole, and stuck in the wood (that's what she said).
5) After the wood dried for about 10 min, I pinned down the flowers along one side.
6) Whoever sent me the brooches on etsy took off the backs because she said it would make it easier, all I had to do was got a set of pins and glue it to the back of the brooch and then stick it into the ball. This proved time wasting and frustrating, so I just picked out a brooch, fitted it in the area, and glued the whole thing down. Sometimes I had to unglue it and move it around, but that was rare and it didn't muck anything up too much.
7) As I glued, I worked in the brooches from my family and friends. Most of the time I tried to put them over the "brooch base" of the brooches I got from etsy, but sometimes they were pretty big so I gave them a space of their own.
8) I wrapped light blue ribbon around the stick twice, gluing it as I went. Once that dried, I wrapped the feeling, "3d" flower ribbon around it.
9) In the wedding section at Michael's I got long strings of pearls and attached them to the base, so that when I held the bouquet it looked like a pearly waterfall.
10) The tule I bought ended up coming in many round sheets, so I bunched them up and used the pearl pins to put them in place by the base and over the start of the "pearly waterfall." Then I glued the sparkly buttons going down the stick on top of the ribbon.
11) Lastly, I took pearl pins, and pinned down pearl embellishments all over. Then, I filled in any holes the brooches left with the pearl pins.

It took a lot of hours, and one awesome Man of Honor to help get it done. But Phew, we got there and despite it all I was so happy with the result, and I can't wait to use it in our big wedding!


No comments:
Post a Comment